0
Basket
 Worldwide Delivery
 info@dawkes.co.uk
 +44 1628 630800
 Award Winning Service
DIY Instrument Repairs
Here are a few "Trade Secrets" from our Workshop...
We can supply all the materials you need, just click on the blue links.
Replacing a Clarinet Tenon Cork
Key corks stop metal on metal contact and are also used to regulate the mechanism.
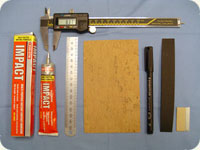
To renew a key cork you will need:
- A sheet of 1.6 mm premium sheet cork
- A tube of impact adhesive - Evo-Stik
- Some 400 grit wet or dry paper
- Razor Blades - Single Edged
- A metal rule, and a pen or some Vernier calipers for measuring.
 Cork sheet: If you're buying cork, be sure to get "premium cork" as it has less holes and is less likely to split.
Adhesive: We use Evo-Stik for fixing our corks, but there are many other brands of contact adhesive.
It's handy to have a small screwdriver so that you can remove the cork from the tenon. We use Vernier calipers to measure the correct width of cork, but you can do the job without these.
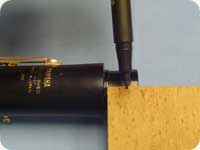 Removing the old cork and measuring the new one.
Well the first thing you need to do is remove the old cork. This is best done [carefully!] with the blade of a screwdriver.
If may take some time to remove all of the old cork, but try to remove as much as you can. We use a chemical degreaser to clean up the old tenon so we get a good bond. You can use methylated sprirts or lighter fluid.
Place one edge of the cork sheet against the cork recess and as accurately as you can, mark the opposite edge with a pen.
You'll need two marks; one at the top, the other at the bottom of the cork sheet so you can line up the marks.
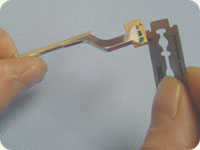
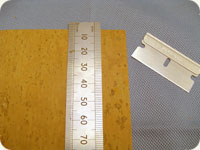 Cutting the cork strip and adding the bevel.
Place the rule hard against the left hand side of the internal jaw and keep the rule in this position. Repeat, this time with the top of the cork sheet.
Simply line up the dots with your rule.
Simply cut the strip with your knife. Now for the tricky bit; cutting the bevel.
You need to cut a 45 degree chamfer or bevel at one end of the cork. It will be a very small bevel, but is important to have it as it will securely bond both ends of the cork together and prevent it slipping.
 Gluing and sanding the cork to fit the socket.
Apply contact adhesive to the 45 degree bevel, the underside of the cork strip and the tenon recess itself. Leave the glue to dry for the recommended period.
Once gone off, wrap the strip around the tenon; clockwise. When you get to the area you started from, you'll see the bevel.
Carry on past this point, continuing to wrap the cork around. Cut off the excess cork as neatly as you can. Use your abrasive paper to smooth the cork until it is round. Keep trying it with the socket it fits into, so you get a rough idea how far you need to sand it. If it's a bit tight, use some cork grease.
 The finished tenon cork!
Well the finished tenon cork should look something like this! It must be tight enough to produce an airtight seal and little joint wobble, yet loose enough for the joint to be easily removed. Also bear in mind that children have difficulty in assembling Instruments with tight joints.
Replacing a Saxophone Neck Cork
If your Sax Neck Cork breaks before your gig, you're in trouble!
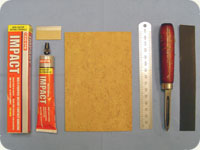
Here's how you replace it. You will need:
- A sheet of 2mm premium sheet cork
- A tube of impact adhesive - Evo-Stik
- Some 400 grit wet or dry paper
- Razor Blades - Single Edged
- A metal rule, and a pen or some Vernier calipers for measuring.
 Cork sheet: If you're buying cork, be sure to get "premium cork" as it has less holes and is less likely to split.
Adhesive: We use Evo-Stik for fixing our corks, but there are many other brands of contact adhesive.
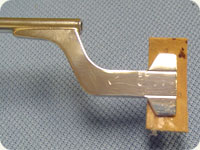
We use Vernier calipers to measure the correct width of cork, but you can do the job without these. We use a scraper to remove the old cork. It's the tool with the brown handle in the photo. You could use a craft blade or even a screwdriver blade.
 Removing the old cork and measuring the new one.
Well the first thing you need to do is remove the old cork. This is best done [carefully!] with the blade of a screwdriver.
If may take some time to remove all of the old cork, but try to remove as much as you can. We use a chemical degreaser to clean up the old tenon so we get a good bond. You can use methylated sprirts or lighter fluid.
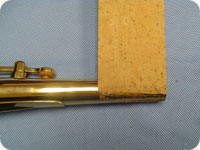
The next step is to measure the width of the tenon which you can do by simply laying the edge of the cork sheet over the end of the neck and roughly working out the desired width. You don't need to be that accurate here, just make sure you go at least as wide as the old cork.
 Cutting the cork strip and adding the bevel.
Simply cut the strip with your knife. Now for the tricky bit; cutting the bevel.
You need to cut a 45 degree chamfer or bevel at one end of the cork. It will be a very small bevel, but is important to have it as it will securely bond both ends of the cork together and prevent it slipping.
Apply contact adhesive to the 45 degree bevel, the underside of the cork strip and the tenon recess itself. Leave the glue to dry for the recommended period.
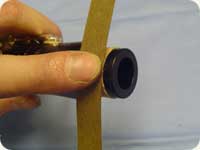
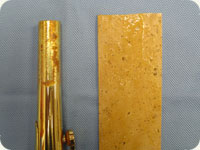
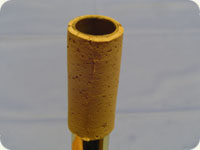
 Wrapping the cork strip around the crook.
Once the glue has gone off, wrap the strip around the tenon; clockwise. When you get to the area you started from, you'll see the bevel. Carry on past this point, continuing to wrap the cork around.
It's a good idea to press quite hard at this point to get the bevel to really stick to the underside of the cork.
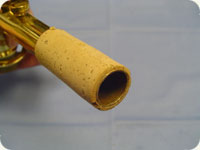
Cut off the excess cork as neatly as you can. Use your abrasive paper to smooth the cork until it is round. It's quite difficult to get the tenon cork perfectly round and also a good fit with your mouthpiece.
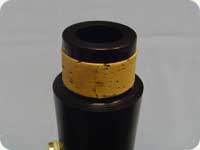
 Shaping to fit
Well the finished tenon cork should look something like this! It must be tight enough to produce an airtight seal, but not too tight or it will tear when the mouthpiece is put on.
You need a slight 'lead-in' or bevel; so that the mouthpiece goes on really easily, so sand a bit more or the cork away at this point. Keep trying the fit against your mouthpiece until it starts to go on
Don't forget that it will get easier when you apply cork grease, so don't get too enthusiastic sanding!
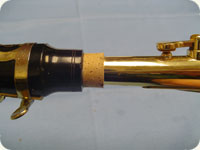 Playing position
Every Saxophonist has their mouthpiece pushed on a different amount. Unless you could see a mark when you took the old cork off, it's not possible judge this. Also if you're fitting a metal mouthpiece you need to take care because they can easily rip neck corks. They are often tricky as they require thinner cork sheet.
Bear in mind that children have difficulty in assembling Instruments with tight corks, so don't make it too tight.
Replacing a key cork
Key corks stop metal on metal contact and are also used to regulate the mechanism.
To renew a key cork you will need:
- A sheet of 1.6 mm premium sheet cork
- A tube of impact adhesive - Evo-Stik
- Some 400 grit wet or dry paper
- Razor Blades - Single Edged
- Some impact adhesive (We use Evo-Stik)
 The first thing to do is to remove all traces of the old cork.
Simply apply glue to the key AND cork and leave to dry.
 With a sharp blade, cut round the shape of the key.
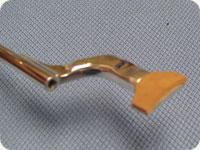 Here's the finished key cork.