Flute Upgrade Guide
1st February 2020In this flute upgrade guide we’re looking at everything you need to know. When to upgrade, why to upgrade, what the spec differences are and much more. Read on for more info…
Why Upgrade?
So, let’s set the scene – you have a beginner flute (or your child does) and you’ve been playing for a few years and love it!
You’re progressing well, getting towards grade 4/5 standard but you want more from your instrument. You’re looking for more from your sound and/or perhaps the mechanism is letting you down sometimes. Well, you can have more – it might be time to upgrade to an intermediate level flute that can help your sound, and help you progress.
The time to upgrade is when you feel that your playing is starting to exceed the limits of your beginner flute. An intermediate instrument can take you to the next level of performance. It will offer increased playability, consistency and tone quality. If in doubt, have a chat with your teacher or one of our woodwind specialist advisors.
Upgrade instruments often include the same features and craftsmanship found in professional models but with a lower price tag.
Beginner instruments are designed with the following things in mind:
- Affordability
- Playability
- Durability
- Simplicity
- Practicality
Manufacturers know how to make a beginner instrument that does the job and guides you through the first important years of your musical journey…but where next?
Upgrade Specifications
At Dawkes Music we know there are important features to look for in a good-quality intermediate flute:
- Solid silver head joint
- Silver plated body and sometimes a solid silver body
- Open hole keys vs Closed hole keys
- Inline or offset G key
- Sometimes a B foot joint
- Split E mechanism
Let’s break down some of the specifications with our explanations below…
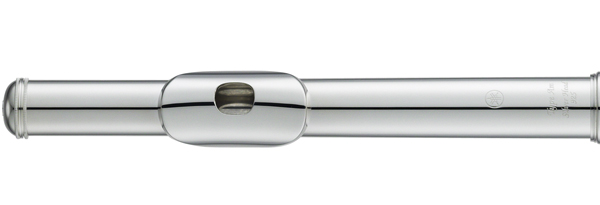
Solid silver head joint
The rest of your flute can be silver-plated nickel like a beginner model, but the solid silver head joint will dramatically improve the sound quality of the instrument. Solid silver provides a richer tone colour and texture to your sound. You may also notice a better responsiveness and more power. Upgrading to a solid silver head joint is probably the most important feature of an intermediate flute.
Silver plated body vs Solid silver body
Intermediate flute bodies are made with silver plating over a nickel alloy. This nickel alloy is often called nickel silver, but in fact there is no silver content at all in nickel silver.
The body material will affect the sound of the flute (like the head joint), however there are some circumstances where it’s not all about the silver content but about the quality of the manufacturing and the design. There are some examples of machine made solid silver body/head combos that are far less popular than hand made silver plated body flutes. Don’t get too bedazzled by silver content! Our advisors can help explain this better if you visit the store or by dropping us an email.
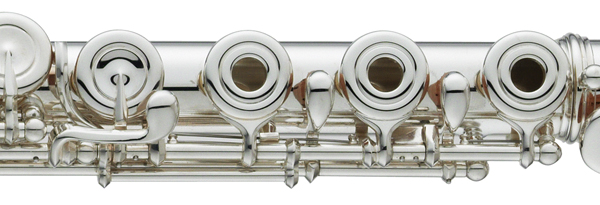
Open hole keys vs Closed hole keys
On an open-hole flute, the keys that you place your fingers on will have a hole that you must cover with your finger. Often, students who switch from a closed-hole model to an open-hole model will feel like they can’t get a good sound on their new flute at first. However, with a little practice (and some hole filling plugs that you can use to help) it’s something most players can easily adapt to, assuming their fingers are big enough.
So what’s the big deal about holes?
Some players will say that the holes allow for venting which produces a better tone or makes certain notes more in tune.
One advantage to open holes for the intermediate flautist is that it forces good hand position. If the holes are not completely covered, then the note will not sound or the tuning will be compromised. Sloppy hand position is generally corrected very quickly once you starts playing with open holes.
The main disadvantage of open holes is that some players may find it physically uncomfortable to cover the holes. Hands come in many shapes and sizes. Some fit the key layout better than others. Fortunately these problems are easily and inexpensively solved with hole plugs, which can be added and gradually removed as the player gains confidence with the open holes.
Inline or offset G Key
This refers to the positioning of the G key on the left hand. When all of the keys on the top of the flute line up the keys are said to be ‘inline’. All beginner model flutes have an offset G key to accommodate smaller hands.
There is no functional difference between an inline and offset G key, the sound will be the same but now we sell 99.9% offset G models in this country so that is what we stock.
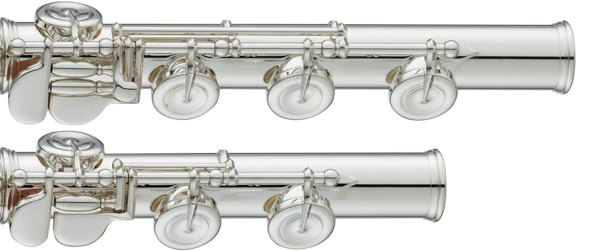
B-Foot joint
When moving on to an intermediate flute, some players consider the B-foot option. Just as the C-foot joint allows the flute to play down to a C, the B-foot joint includes an extra key that brings the flute’s lowest note down to a B. This extra key alters the weight and balance of the instrument. Commonly 90% of our first upgrade models sold would still be with a C-foot, the B-foot option is more commonly considered at the pro end of the range.
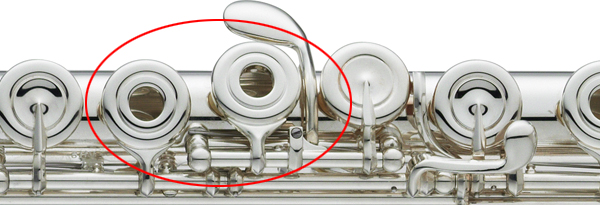
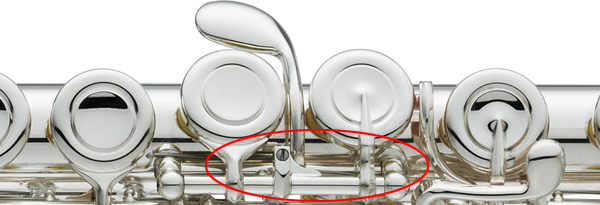
Split E Mechanism
The split E mechanism is designed to improve the response of the third octave E. On a flute without the mechanism (fairly rare nowadays), the G key, operated by the ring finger of the left hand is directly linked to the key next to it. The keys are either both open or both closed. On a flute with a split E mechanism, the high E fingering allows the G key to be open while the key next to it is closed. This allows the high E to respond more effectively.
Professional Flute Options
Should you decide to continue with your playing beyond grade 8, you might consider investing in an advanced or professional model flute.
A professional flute will commonly be all silver; including the head joint as well as the rest of the body of the flute. You also will find professional models that have solid silver mechanisms, although some have silver-plated mechanisms, the cost of having solid silver keywork does push the price right up usually.
An advanced model flute will have a B-foot option and it’s most common that open-hole keys are chosen. Many also also have French-arm keys. In a French-arm mechanism, the small piece of metal that attaches the key to the rest of the mechanism extends all the way to the centre of the key, rather than stopping at the edge of the key. This allows the key to be pressed down more evenly, which covers the hole better and leaves less room for air leakage from the key.
How To Test Flutes
Choosing any instrument is a matter of personal preference. What works for you? What feels right for you? What sound do you like? Testing is vital and at Dawkes Music we are happy to accommodate you in one of our many practice rooms Monday to Saturday, so you can spend time (with expert advice on hand!) finding the perfect flute.
Remember we also have a state of the art Acoustic Room. The Virtual Acoustic Environment allows you to alter the acoustic dynamic of the room so you can hear your chosen instrument in stadium, cathedral or intimate recital room.
So when you get here, these are our TOP 10 TIPS for testing Flutes:
1. Start with low register long notes, slowly descending from B natural, down to Bb, pause. Listen. Then Bb to A, pause, listen, play, pause, listen and repeat, all the way down to low C. This will give you a great idea of the tone quality of the low register.
2. Test octave leaps, and repeat several times. How easy is it to leap up to a clear 2nd octave?
3. Play 2nd octave B and slowly play long notes by semitone; B to C, C to C#, and go up as high as is comfortable for your level of playing. Listen closely to the tone quality of the high register. Allow yourself to change the lip position on the lip plate to find the centre of the sound on your new flute.
4. Crescendo and diminuendo on various notes chosen from all three octaves.
Push the flute to “fff” gradually, and dim. (diminuendo) to ‘ppp’ gradually. Discover how easy the flute is in playing simple slow melodies with differing dynamics.
5. Test tonguing: Single tongue quick repeated notes in each of the three octaves. Experiment with fast single tonguing leaping the 1st, 2nd and (if possible) 3rd octave, try some staccatos too.
6. Try the speed of trilling the keys, especially the thumb key. Do the keys feel light and responsive? Can you trill quickly with any key?
7. Work through some studies, grade pieces, orchestral/ band parts (bring them with you to your testing session), whatever flute pieces are most comfortable for you at your level.
Maybe record your playing on each instrument or your smart phone or via our Acoustic Room and see if you can distinguish one flute from another.
8. Bring a tuner, and play a slow chromatic scale. Also play the octaves, fifths and other intervals into the tuner, and find out if you can easily get the range of notes “in tune” without changing your embouchure excessively. No instrument will be ‘perfect’ but it’s about what suits your style and what is acceptably close in the overall intonation and understanding the compromises of each instrument…they’ll all have some!
9. Take a moment before arriving to think about your current sound, and try to describe it and what you might like to change about it. For example; I would like it to be richer in the lower register, or my current flute feels too bright in the higher register etc. Some of these things are to do with your level of experience but it’s about having a concept of what your own sound is so you can understand how new flutes sound different.
10. Come with someone with you who already knows your playing if possible. It doesn’t need to be a musical maestro! Commonly people who regularly hear you play will spot differences in the new flutes that you may not as the person on the other end of them.