Home Recording – Top 5 Tips
7th May 2020Whilst performing with friends and in public isn’t an option at the moment, plenty of people – myself included! – are exploring the world of home recording. After all, as musicians, we live to showcase our art!
But a percentage of these people – again, myself included! – are novices when it comes to the editing processes. From one beginner to another, here are a few tips I’ve figured out since I started experimenting with home recording and video editing.
Arranged, performed and edited by Jesse Harte
Since March, I have produced two ‘multitrack’ videos -videos of myself playing all the parts of an arrangement. This format works for what I want to do, as I enjoy arranging songs and, as a woodwind doubler, like being able to put my voice into the world on as many instruments as possible. I’ll be focussing on what you can do at home to start making your own multitrack videos!
1 – Anyone can do it!
This is my first point, because I’d initially like to highlight how easy it can be to produce your own videos. Whether you’re playing by yourself, or want to ‘multitrack’, or even collaborate with a friend … if you have a smart phone, then you have the tools to do so!
You could film yourself playing separate parts, and then stitch it all together in a separate app or on your computer. Alternatively, there are smartphone apps that can even do this bit for you – like ‘Acapella’.
2 – You can do it all for free!
Worried you don’t have the fancy equipment to do a good job? Concerned you can’t create something sleek looking without dropping a load of £££ on the software? No need! Nowadays, there are programs that are free and open source for all sorts of processes – these are safe and easy to use, and are often comparable to their commercial counterparts.
For audio editing, I have used Audacity in the past. This has all the tools you need to produce high quality audio files. The interface is clean and simple, with options to help with processes such as removing background noise, adding reverb, and basic EQ.
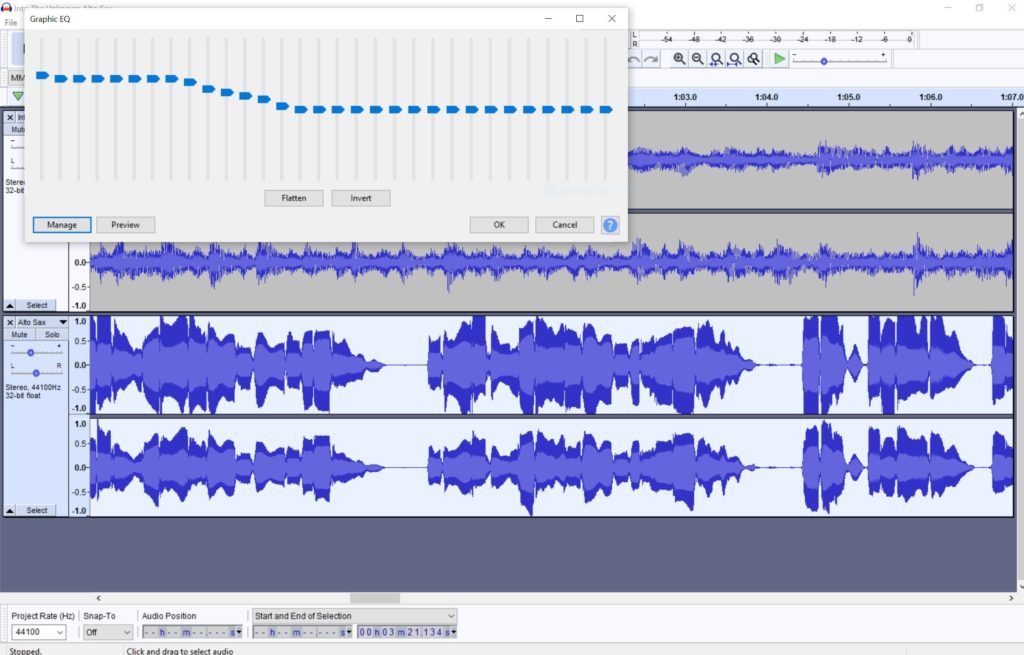
This current setting is a preset known as ‘bass boost’ – which does what it says on the tin!
Video editing was a concept that scared me – I’d done some basic audio stuff when I was studying, but video was new ground for me! Luckily, I found Kdenlive; this is another free to use, open source programme. Although there are a lot of options to explore, I found it very easy to just have a play around to see what did what. The online support and guides are very well written and laid out, so I found it simple to find tips and tricks to help with what I wanted to do.
- Kdenlive – free, open source video editor
- Audacity – free, open source, cross platform audio editor and recording application
- BandLab – powerful smartphone audio recording and processing
- Acappella – simple-to-use ‘multitracking’ smartphone app
Like I mentioned above as well, if you have a smart phone then you have a video camera, and decent quality microphone. You can either record into your phone and mix it there (apps like BandLab are surprisingly comprehensive and powerful), or plug your phone in to your computer and use it as the microphone to record into your DAW (digital audio workstation).
3 – Record to a backing or click track
You’ve probably seen videos of people playing to accompaniment from themselves or a backing track – and they always have headphones in! Record to your track, or even just a click, to make sure the audio is lined up correctly with everything else you’ll be adding. Recording with headphones/earphones in means only your playing will be picked up – then you can mix your playing with the other audio without it appearing in the ‘background’.
Arranged, performed and edited by Jesse Harte
When I record my own arrangements, I export the individual MIDI files from my notation software, so each instrument exists in a separate MIDI channel in the audio editor. I then record them one by one, muting the MIDI that I’m recording a live duplicate of, playing along to the rest of them to ensure correct timing and phrasing. It’s fun to hear my arrangement slowly transform from computer generated sounds to my own live recording!
4 – Research and experiment
Unfortunately, the research can be the tedious bit! Get the basics under your belt first – take a look into recommendations for audio EQ (equalisation), compression, and effects to see what works for most people. Record a simple line of audio and see what you can do with that! Then, expand upon this and just have a play with settings. Who knows what sorts of fun sounds and effects you could come up with? What’s the best way you can find to make your recording sound ‘believable’ and ‘professional’?
A lot of my experimentation time came from playing around with video effects to get all of my visuals on one screen. For the ‘Blackbird’ video, I simply resized each video to about 50% it’s original size, and altered their position to get them into the desired order. This was simple, as Kdenlive allows you to ‘lock’ the image to the left, right, top, bottom, or centre.
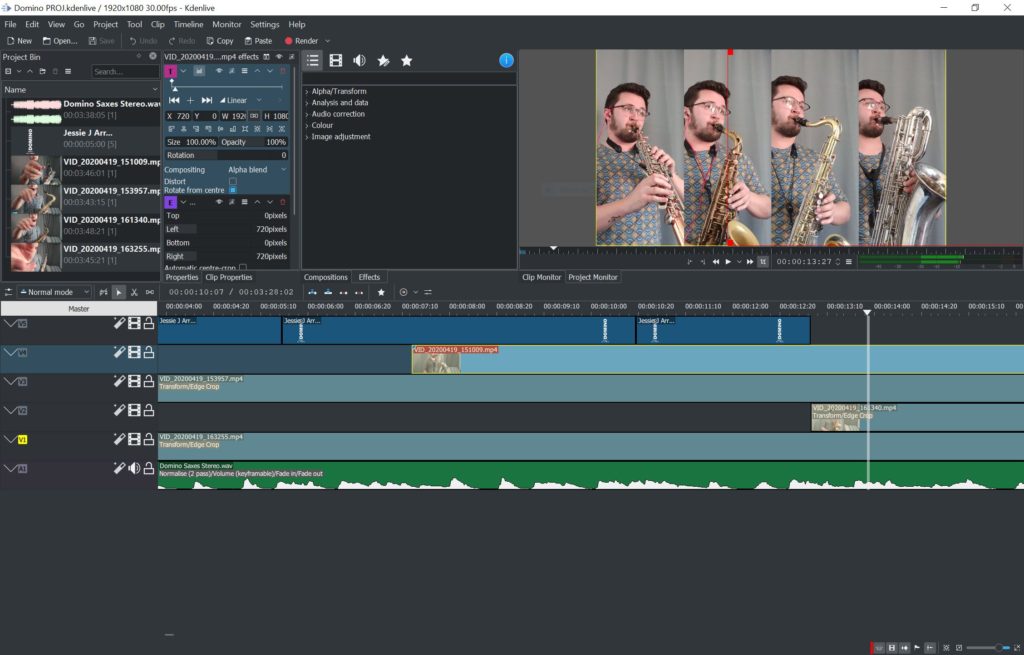
This shows the four video channels and my one audio channel. Aligning audio and video takes a bit of patience and a steady hand!
Similarly, for ‘Domino’, I had a play around to see what I liked most – to get the four vertical videos, I had to crop each video from either side so the middle quarter was all that was visible. From there, I needed to reposition each video so that there were no gaps and they filled the screen equally. It took a little bit of maths (oh no, not my favourite thing!) to figure out the correct width, how much was needed to crop, and the X / Y axis positions.
Remember there’s no rule book dictating how your videos should look and sound! Have a play and see what you can create.
5 – Fix your environment!
The best way to get a clean recording is to make sure your environment is as dry as possible. That means eliminating as much natural reverb and echo from your room, so that the source sound (your playing) is as pure as possible. You can also help yourself to remove breathy sounds by using a pop filter and wind shield over your microphone. (I once made a pop shield by bending a wire hanger into a circle and stretching tights over it!)
Where possible, record in a carpeted room. You might want to close your curtains, and hang up blankets – this isn’t for sound proofing, but you’re eliminating flat surfaces that the sound can bounce off. Rugs, blankets, carpets, curtains etc. will absorb ambient sound, and stop your microphone from picking up echo/reverb.
What can I use to record at home?
Aside from a phone and free-to-use programs, you are of course welcome to invest in more specialised gear! You can really elevate the final result with good quality gear – and it doesn’t even have to cost you the earth.
- MICROPHONE
- In my experience, for home recording it’s best to use a microphone with a cardioid polar pattern … a what? To put it simply, cardioid mics will mostly pick up sound from directly in front of it, picking up minimal sound from directly behind it. This means you’ll pick up more instrument sound and less of the room. We sell cardioid microphones for as little as £45 from Shure, such as the PGA48 Dynamic Microphone. Alternatively, a more sensible option for wind instruments would be the Beta 57A Dynamic Instrument Microphone.
- Each of our wired mics come supplied with an XLR-XLR cable, but we also provide high quality cables if you’re looking some something highly reliable and long enough for stage and studio use! This D’Addario Custom Series XLR Microphone Cable is 10 feet long – no need to feel tethered right next to your setup.
- OTHER GEAR
- To link your microphone to your computer, you’ll likely need an audio interface. This provides power to your microphone, and increases the sonic capabilities of your computer. Some USB microphones have a built in interface.
- And of course, you will need an adjustable microphone stand.
Hopefully you will have found some use out of this blog on getting started with recording at home! As with playing an instrument, it takes practice. Create a few ‘throwaway’ tracks to have a play with to get yourself into the swing of things.
Jesse – Woodwind Specialist and Sales
If you have any questions about the featured products, or any of our services, feel free to get in touch via email, drop us a message on the website LiveChat, or call 01628 630800.