A Beginner’s Guide to Reed Adjustments
29th May 2025Whether saxophone or clarinet, your reed is the heart of your sound, without it you couldn’t even make a sound! A great reed can make playing effortless, while a poor one can turn practice into a struggle. Learning how to adjust reeds gives you control over tone, response, and comfort. In this beginner’s guide to reed adjustments, we’ll show you how to get the most out of every reed.
Suggested Tools You’ll Need
- Reed knife – we recommend the Reed Geek – Black Diamond
- Fine sandpaper (400–600 grit)
- Reed rush or Dutch rush
- Flat glass or acrylic plaque such as the Vandoren Reed Resurfacer
- Reed trimmer (optional)
- Light source for backlighting (lamp or phone torch)
Reed Adjustments: Step-by-Step
1. Soak the Reed
Soak the reed in clean water (not your mouth) for a minute or two before adjusting. This helps prevent cracking and gives more accurate results when scraping or sanding. Note: Avoiding saliva when soaking your reed can help extend its lifespan, as it reduces the likelihood of bacterial growth.
2. Reed Troubleshooting
It is important to know what you are wanting to get out of your reed in order to know where to start adjusting. Here is a list of common symptoms and the how to adjust accordingly.
| Symptom | Cause | Solution |
|---|---|---|
| Too stiff or resistant | Tip or vamp is too thick | Thin the tip slightly |
| Too soft or airy | Tip is too thin | Use a reed clipper |
| Unstable or squeaky | Imbalance or poor heart structure | Balance side rails and refine heart |
| Leaky or inconsistent | Warped table | Flatten table on sandpaper |
3. Flatten the Table
Place the reed flat side down, known as the reed facing or table, on 600-grit sandpaper laid on glass or a marble surface. The Vandoren Reed Resurfacer tool is a great option because as well as the glass table to rest your reed, it also comes with a handy scraping tool. Lightly sand in straight strokes to even out the back. You can also use the Reed Geek tool here to flatten the table. This ensures the reed has a secure full seal on the mouthpiece therefore reducing air leaks.
4. Balance the Reed
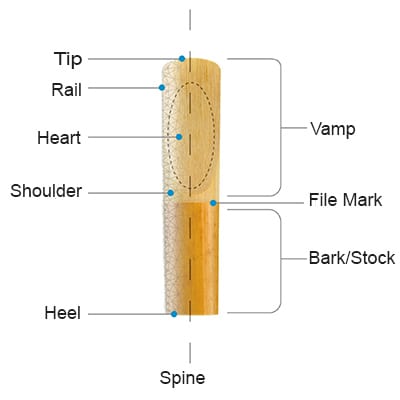
Hold the reed up to a light. If one side looks darker or thicker, it needs thinning. Using a reed knife or reed rush, gently remove material from the thicker side rail using diagonal, outward strokes. Keep both sides symmetrical.
5. Thin the Tip of the Reed
If the reed feels too stiff overall, gently thin the tip area (top 1–2mm) using sandpaper or a knife. Be conservative – too much will ruin the reed. Focus on the center and blend toward the edges.
6. Refine the Shoulders
To improve flexibility and articulation, you can lightly adjust the shoulders (where the vamp widens toward the rails). This should be done symmetrically and very gradually.
Top Tip for Soft Reeds
If a reed feels too soft but plays well otherwise, you can use a reed clipper to trim a tiny bit from the tip. This increases strength and brightness, but can also reduce flexibility, so proceed cautiously.
Test After Each Adjustment
Play test the reed:
- Check response across registers
- Play soft and loud dynamics
- Articulate staccato passages to check response
Allow each reed to rest between practices and adjustments to dry thoroughly before storing or playing again. Always rotate between 3-5 reeds to keep them in good condition.
Final Tips for Success
- Use a reed case to prevent warping by keeping the reed flat and ventilated.
- Keep notes on what works for each reed (date, adjustment and result.)
- Practice on old reeds before working on your best ones!
By learning to tweak your reeds properly, you can take control of your sound and make every practice session more productive and enjoyable. Whether beginner or advanced, with time and experience, reed adjusting will become as second nature in your practice routine as scales (we hope!)